Friday, January 27, 2012

Sangria!

Ahhhhh...So, It's Friday, and we made it through another week. Time to put up my feet, watch some uninterrupted television and relax! "MAAAAAMIIIIII!!! Giada I said STOP it!!!" ***my dreams come to a screeching halt***

OK, so my life does not do well in a relaxed state, and well, neither does my family. But I happen to like the chaos that I live in, it makes me aware of how we are always teetering on the brink of insanity, and in all seriousness, there are days when you just need to pick up a drink and embrace it with a smile.
For days like these, I like to drink. Just sit and watch my mini people with a glass of wine in my hand. Or a shot of Patron, depending on how crazy it really is...
But not today. Today I will prepare for tomorrow. Today, I prepare Sangria.

Remember a few posts back how I mentioned that Mia goes to the greatest pre-school ever? As in the history of the universe? Yes? OK, so I've decided that I will start a family group, for all the parents who take their kids to this wonderful place of rainbows, unicorns and learning. Invitations have been sent for a play date and tomorrow is the big day. People are bringing all kinds of food. I am *gasp* providing drinks. I hope they end up liking me.

So, for the Sangria you will need:


1 large bottle of Sangria style wine. I like Carlo Rossi.
1 cup of spiced rum
1/2 cup of Grand Marnier
1 can of cocktail fruits (drained of the syrup they come in, I usually don't use the entire can)
2 large apples + any other fruit you like, I usually add oranges in thin slices, but I didn't have any today....
1/2 cup of sugar, I didn't have white so I used brown
1 cup of water
3 or 4 cloves
3 Cinnamon sticks
1 or 2 Bottles of Ginger Ale

In a small pot combine the water, sugar, cloves and Cinnamon.


Put it on high heat, let it come to a rolling boil.


Then lower temperature, and let continue to boil uncovered for about 15 mins. Let cool completely

Peel and chop your fruit into small pieces


Place in the bottom of a large container


Pour the wine on top of your fruit


Add the liquor (both the rum and Grand Marnier) and syrup (completely cooled)


Let chill for no less than 4 hours, best if overnight.


Transfer to a nice pitcher and to serve, pour over 1/2 glass of ice cold Ginger Ale.

Aaaaahhhhhhhhh!!! SO refreshing! What? What was that?? Oh, You're welcome! :)

Tuesday, October 18, 2011

Green Spagetthi - Tallarines Verdes - Pesto Sauce

OK, I'm a horrible person. I'm talking absolute garbage. I have a friend who asked me for this recipe about 8 months ago and ***hangs head in shame*** it is just now that I get around to doing it. I could make up all kinds of lies and say that I was busy with my girls, or bringing about world peace in some far away country. But the truth is, I get lazy about writing. So, there it is, the truth shall set you free, and I feel better already.

I have to begin by saying that it is a very traditional Peruvian recipe, so it is not your regular pesto sauce per se. My family LOVES it, and every time I make it I get rave reviews at the table. Mia would be happy if I made this EVERY.SINGLE.DAY, (and secretly I think Alfredo would be too) and since its fairly easy to make, I am only happy to oblige.

So here is the recipe:

Ingredients:

1 Container of Basil
3/4ths of a Bag of Spinach
1/4 of an Onion cut into thick slices (you'll blend this later so, no worries)
3 Garlic Cloves
2 cups of Milk
1 entire package of Queso Fresco
somewhere in between 1/4 and 1/2 a cup of Extra Virgin Olive Oil

First, saute the onions and garlic until caramelized


After this, add about 3/4 of the pack of Queso Fresco (cut into chunks) into the blender along with the spinach, basil, sauteed onions and 1 cup of milk.


Gentlemen, start your engines!!! Start blending this mixture and add the additional cup of milk to help with blending. You are going to have to have to stop and go a couple of times to help out with a spoon...

Once its blended and has a sauce like consistency start drizzling in the oil a bit at a time


Its going to end up looking like this:


Now you can go ahead and boil your pasta and cook to al dente.

Heat up a pot to medium high heat and add some olive oil. Once its hot enough dump the whole contents of the blender into the hot oil and stir until hot and bubbly.


You can now take out some of the cooked sauce and leave just enough to coat the amount of pasta that you have made. This sauce freezes amazingly well, just reheat in a pot and voila!


I serve this with some pan fried chicken, and today as usual, it was gone in a few minutes!

There! I feel like a much better friend already!

Thursday, February 10, 2011

Pineapple Pie

Mia goes to the best pre-school ever. Yes, I said ever, as in the history of the entire universe.
She has these wonderful set of teachers who love her and patiently guide her little inquisitive mind in the path of knowledge. If you know Mia, then you know that anyone who is able to keep her entertained/active/engaged for more than 1 hour deserves a medal. Well, these teachers deserve a statue, but while I wait on my bronze delivery I will set off to make a yummy pineapple pie.
I've made this before to take to her school to thank them for all they do for my little hurricane, they loved it and kept asking me for the recipe. Again, as I've said before I don't use recipes so I couldn't share it. But this time I wrote everything down as I was making it so....here it goes!!

What you will need:


A ripe pineapple (smell the bottom of the pineapple, it should smell like a, well, pineapple...duh) You may have to buy a not so ripe one and let it ripen at home for 2 or 3 days.
1 cup of brown sugar
1/2 a stick of butter
2 tablespoons of flour
1 tablespoon of ground cinnamon
1 teaspoon of ground cloves
1 teaspoon of vanilla extract
1 shot of rum (spiced rum is best, but you can leave this out)
Pie crust

Tear the top of the pineapple (the crown part) if you want to, you can reserve and plant this later on. They are super easy to grow in any pot and the taste of a homegrown pineapple will blow your mind away.

Cut off all of the skin off the pineapple. You could buy it peeled and cored but why?? You can use the peel to make yummy pineapple refreshment! The way I see it is I PAID for that peel (a peeled pineapple is the same price as an unpeeled one) so I'm going to use it.


So I will take these following lines to go completely off track and show you how to make some pineapple refreshment. Once you've peeled all the skin off the pineapple simply dump it in a pot with water. Put 1 or 2 cinnamon sticks and about 2 or 3 whole cloves. Put it on high and bring it to a boil, once it does, put the heat on low and leave it for about 30 mins. Remove as much pineapple skin as you can and then stir in the sugar to taste while its warm (it makes the sugar dissolve much faster). Once its cooled strain into a pitcher and add the juice of 1 lemon. Serve it up chilled.


Ok, back to the pie. Cut the pineapple up in bite size chunks, discard the core.


Meanwhile heat up a large pot or skillet and melt the 1/2 a stick of butter, once melted add the flour and mix to make a roux. Add the pineapple chunks and coat them with the roux. The pineapple will release its juices and mix up with the roux, continue stirring so that it doesn't stick or burn, do this for about 10-15 mins. Before adding the sugar taste this mixture, the pineapple may be so ripe and sweet that a whole cup of sugar may not be needed. Add the sugar to taste and stir to coat the pineapple, add the remaining ingredients (cinnamon, cloves, rum and extract). Turn off the heat and let cool.

Ok, there are days in which I feel like Suzy Homemaker and make HUGE batches of pie crust (it freezes real well) and then there are days that I totally cheat and buy the already made version that is in the cookie section. The finished product is yummy regardless.

Cover the bottom of a pie dish with crust and fill it up with the pineapple filling.


Cover the top with another piece of crust. Make some holes with a fork so that steam can be released during the cooking. Brush the top with some melted butter.


Put it in a 350 oven for about 30 mins or until the crust is golden. Let it cool and serve. YUM.

Sorry I didn't take any pictures of the finished product. My husband and Mia couldn't wait and started picking at it before I could get to it. They don't care about the "let cool" period.

Thursday, January 27, 2011

Macaroni and Cheese please!

Ok, so by now you know that I am not American by birth. I came to this lovely country when I was about 12 years old, with a set of taste buds that were already deeply rooted in the Peruvian flavors that I enjoy so much. I didn't eat a PB&J sandwich until I was probably 16 years old, and that was thanks to an All American friend who refused to let me go through life without trying this delicacy. The same goes for Macaroni and Cheese. I tried this dish late in the game and although I liked it, it was never one of those dishes that I cared to re-create in my kitchen. Until now.

My daughter, although brown haired, brown eyed and cinnamon skinned is as American as well, flan. Don't understand? I guess you don't live in Miami now do you?

No, really, Mia likes Mac and Cheese as much as the next kid and while we lived in Memphis she tried this southern gooey goodness many times. But that was the South, and Florida is, well its the south too...but...really, its a world unto its own. Regardless of this, I had promised Mia I would make some Macaroni and Cheese specially for her and that kid has the memory of an elephant, whenever its convenient for her of course...

So I armed myself with about 10 recipes and took out bits and pieces that I liked from each one and made my version of Mac and Cheese. Again, I remind you that I am not American nor did I grow up eating this, so if I butcher this recipe or if you find it horribly different from the classic version that your grandma made, then please accept the apologies both from myself and my Inca ancestors.

So with my apologies made, on I go.

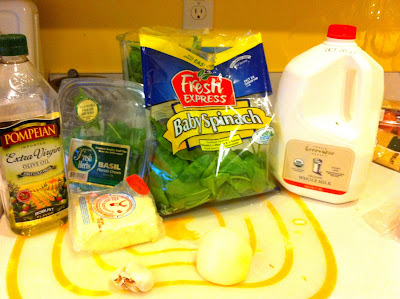
These are the items you will need:

For the Mac and Cheese

1 Box of Macaroni noodles (1# box)
2 Teaspoons of dry mustard
2 Teaspoons of Paprika
3 cups of Milk
3 tablespoons of butter
3 tablespoons of all purpose flour
1 egg
1 Pound of Sharp Cheddar
1/2 a pound of Monterrey Jack cheese
1/2 cup of grated Parmesan cheese
Broccoli
Red Bell Pepper diced in cubes
Thyme
1 bay leaf
Nutmeg
Salt Pepper
bread crumbs

For the Chicken

2 Chicken breasts
Breadcrumbs
1 egg
some milk
salt pepper


Please imagine the missing ingredients here...

Ok, so begin by grating the cheeses, I was going to buy the shredded kind, but all the recipes said that it was best to grate it fresh....so on I went. Actually, this was a great activity for Mia to help out in.


This actually was messier than I anticipated, especially for an almost 4 year old to try (I can't believe I have an almost 4 year old kid!) but it kept her entertained for a while. Kept me cleaning for a while as well, but that's life.

Ok, now that your cheese is grated you can begin. Cook the macaroni until a bit underdone, about 5 minutes, remember that this will go into the oven for about 30 minutes and will continue cooking!! Drain. Then, place a large pot and put on medium heat. Melt the butter. Once this is melted add the flour, mix well so that there are no lumps and continue to stir in order to cook this "roux" and take out the flour-y taste from the mixture. This should take about 5-10 mins top. Add the dry mustard and about a teaspoon of the freshly grated nutmeg. Now, add the 3 cups of milk, stir well so that there are no lumps. Add to this the thyme (about a palmful) and bay leaf. Keep this on medium heat and stir until it gets a bit thick another 10-15 minutes. Once it gets to a creamy like consistency, (don't worry if its a bit watery, mine was at the beginning as well) turn off the heat and add the Cheddar and Jack cheeses. The residual heat will be enough to melt this.

Next put the already undercooked and drained macaroni in a baking dish and add the cheese and veggies (I had to make it healthy)


Pardon our complete disregard to the pictures on the cutting boards, we're WILD!

You can put these veggies raw, I like my broccoli with a bit of a bite still in it if you don't then I guess you could cook it for a few minutes prior to adding it...but that's just another messy pan, so why bother?

Mix the cheese and veggies in the baking dish, cover with the breadcrumbs and top with the Parmesan cheese. Bake uncovered for 30 minutes. Finish with the broiler on high until golden brown and bubbly on top.

Now on to the chicken.

I made some breaded chicken cutlets to go with this meal ("apanado" for my Hispanic peeps)

Butterfly the chicken breast into thinner sections add salt pepper and set aside. In a deep bowl mix the egg and milk and in a shallow large plate place the breadcrumbs. Heat a skillet with some olive oil. Coat each chicken section with the egg wash and then place on the breadcrumbs and cover. Fry until golden brown. Repeat with all pieces. Serve together with the mac and cheese.

Unfortunately I don't have a finished picture to show you because we were just too hungry to remember take one before we dug in. But it was good. At least as good as this Peruvian girl can possibly make!!

Tuesday, January 4, 2011

Chinese is Chineasy! :)

I must have inherited my Grandmother's aversion to throwing food away. I save all scraps of food and try to incorporate them into a dish in one way or another. I actually laugh at my mom for doing this, but I secretly and shamelessly can not turn away from this inherited gift to give any and all leftovers a face lift and turn them into dinner for some other night.

Being Hispanic, my family eats a lot of rice with our meals. I think over 80% of our meals include rice as a side dish, because of this, I also find myself with lots of rice as leftovers.
And so a typical Tuesday evening begins. I lie, there is nothing typical in my life...
I was actually craving Chinese food with all of its crunchy good for you vegetables, and I knew I had a pot of leftover rice from Sunday that needed to be utilized ASAP. It would not go to waste, not on my watch (and its always my watch),

So off I go, flying through the kitchen (don't worry its not a very large kitchen) looking for all the ingredients needed to make Chicken fried rice.


For this dish you will need:


6 Boneless/skinless chicken thighs cut into bite size pieces (You can use Chicken breast but I find this a bit dry) I've also made it with Shrimp and its oh so good!
4 cups of leftover white rice (you can make this ahead the night before)
1 Red bell pepper cut into cubes
1 pack of snow peas cut into pieces
1 pack of Scallions cut up
1/2 a medium yellow onion cut into cubes
About 1/2 a cup of Soy sauce
A dash of Worcestershire sauce
1 chunk of fresh ginger (ginger freezes real well, so you can use what you want and freeze the rest in a zip bag. The plus? you don't have to peel frozen ginger, the frozen peel actually never grates! You're welcome)
Sesame seeds
Sesame seed oil, you can use regular olive oil instead

Heat the oil in a large pot, wait until hot and sprinkle about a palm full of sesame seeds wait a minute until you hear them or see them popping and put in the chopped up onions. Caramelize. Add the chicken and leave it alone. Don't stir it, don't do anything, just let it be. I know, hard right? wait until about 10 minutes have passed by or until you see that it has developed a nice brown color on the side that is touching the pot. Now you are free to stir. Move it around and grate about 2 or 3 tablespoons of ginger into the chicken. Add about 1/4 of the cup of soy sauce and a couple of shakes of the Worcestershire. Cover and let it simmer on low until it is cooked through. Remove into a large bowl with all the juices.

In the same pot add a bit more of oil and add half the vegetables. You don't want to cook these veggies, you want them to stay crunchy and bright, so sauteing will only take about 5 minutes TOPS. Add half of the remaining soy sauce and shave about 1 tablespoon of ginger. Remove to a bowl. Do the same with the other half of the veggies. The reason why you don't want to do them all at once is because you want to stir fry them, if you crowd the pot they will just get watery and mushy.

Add the already cooked leftover rice to the pot and stir so that the rice can get coated with some of the left over bits of soy sauce and heat up. Add the veggies and chicken and mix in as well.

I usually add more ginger and soy sauce at the end to my liking.


(disclaimer: The pot in the picture was the first pot my mom purchased when we arrived to this country almost 20 years ago. Yes, it is old and battered and not very nice to look at but I will never get rid of it. I have made firm plans to be buried with it actually)

Finished! You have a dinner that is full of yummy good for you veggies (I like to add some bean sprouts as well, but I didn't have any on hand today) that was made in about 30 minutes. Seriously, no take out can beat that!


Saturday, January 1, 2011

2011....Bring it!

Ok, so I love to write. It helps me relax. Cooking does the same thing for me, I am able to loose my self in the mundane chopping of the onions and forget that there is a preschooler at my feet asking to watch Dora for the millionth time or a Baby who (most likely) needs a diaper change. Fret not dear reader, that is why I married the man I did. He is the best Diego/Handy Manny/Dora role player and is a whiz at making sure that Giada's butt stays poop free. So off I go to cook.

I always get asked to share recipes by my friends and family, and I never have them. I don't really cook with a recipe. The dishes I make are dishes that have been in my family for generations and that I am sure reside in my Grandma's old and yellow handwritten recipe book. But for quick daily access I have stored them in my memory and at least up to now, it hasn't failed me once. So, now in this technology filled world, I will post them here. To forever be etched into cyberspace. How poetic. Bleh.

So, today is the first day of the year and to us that means Lentils are in the menu. They are supposed to represent abundance and its a typical dish to make as a year starter. Here is my version:

2 small bags of Lentils - soak for 2 about hours in water to soften (even though the instructions say not to do it...my grandma did it, so I do it too. Wanna argue? take it up with her)

1 palm full of Cumin
1/2 palm full of Turmeric
Ham Hocks (Smoked Turkey wings work also)
2 Bay Leaves
2 Medium Onions or 1 large one, chopped. I like to work with yellow or white.
Garlic to taste (to me this always means tons of it, but 3 cloves will do)
1 box and a half of Chicken Stock
Salt and Pepper
Olive Oil

In a pot heat the oil and place the bay leaves, cumin and turmeric stir and wait until its hot and stir. Add the chopped onions and chopped garlic. Let it sit with the spices for about 5 minutes and then stir. Wait until the onions and garlic have taken the flavors of the spices and have softened, about 15 - 20 minutes. Season with salt and pepper. Add the Lentils (which after 2 hours should have soaked up the water they were soaking in) add the entire box of chicken stock and about 2 cups of water and stir. Season again with salt and pepper. Cover and let it cook on medium low heat until the water is consumed and lentils are soft and puree like about 45 minutes. Depending on your taste you can add more chicken stock to loosen up the lentils or leave as is. I like them real soft, the consistency of mashed potatoes so I add more stock at the end.

You can make half of this recipe if you wish, you will still get about 3 or 4 large portions of lentils. But I like to make this in a huge batch because it freezes well and can be later added to soups, rice, or even ground beef for a lentil based chili. Hey, I like to relax as well! And with the ever present gym classes, running late from work and other mind boggling tasks I am happy to always have "reserves" in my refrigerator.

I serve this with rice and chicken or as a side dish to a steak with salad. YUM. Additionally to being delish and jammed packed with protein and iron, this dish is also extremely healthy and dirt cheap. The bags of lentils were .89 each and I'm always fully stocked with onions and garlic, so I fed my family of 3 (baby doesn't count yet!) for about 2 bucks and change a plate....considering that I made some salad and steak. Plus I have lots of left overs to freeze for another night.

Friday, October 15, 2010

CVI.CHE 105

As you know, my husband and I are Peruvian, therefore we have a passion (OK, more like obsession) for Peruvian food. I will argue with anyone that it has got to be one of the most varied and delicious cousines out there.

But I digress. We had heard about this CVI.CHE 105 place from some friends and it was always in the back of our minds to go there if we where ever in the downtown area. Coincidentally, my sister in law called me one day and raved and raved about this new Peruvian place by her house....uhmmmm? What was the name? Once we certified that it was indeed CVI.CHE we made instant plans to go that weekend, but that week one of our hurricanes was sick so we had to push it back, ah, the joys of parenthood...

Two weeks later and with an army of friends who we had convinced to go with us (by convinced I mean randomly mentioned and they pounced at the idea...our friends are all food lovers as well) we went. Downtown Miami bound, armed with our GPS, coloring books and crayons for the little one we were excited to finally try this place.

Upon arrival, we found parking which is not an easy task in Downtown, we hopped out of our super cool van and we were on our way.

The restaurant itself is located at 105 N.E. 3rd Ave. Miami, FL 33132. Just like the restaurants located in the area this one is a very urban and trendy restaurant which as far as Peruvian restaurants go is a breath of fresh air.

Since Rashida (my sister in law) and Guillermo (my brother) had been there before, they recommended what items to try from the amazing sounding menu. We ordered some Ceviche en Salsa de Rocoto (Ceviche in hot peppers sauce) which was out of this world. I am not a spicy kind of person, but this dish was so delicious that I didn't mind the burning sensation from the heat. The second dish I tried was Pulpo al olivo (Octopus in an olive based mayonnaise) which was so tender it literally melted in your mouth like cotton candy. Alfredo had his classic Lomo Saltado (Sauteed onions, tomatoes with beef and french fries)and I had some Arroz Chaufa de Mariscos (Seafood fried rice). Our friends ordered a list of different dishes and everyone was equally amazed with their choices.

Since my fist (second, third, fourth and so on) visit was while I was pregnant I could not partake in the drinking that our friends were doing. But in the last visit, when our little one was just 1 month and half I was finally able to try a cocktail of Pisco and Passion Fruit Juice and it was as heavenly as I had imagined it. What we did notice in the last visit is that they don't have a baby changing station in the bathroom! This is such a pet peeve of mine, do they think that parents of young babies don't want to go to a restaurant? Do they not care to have us as customers? Seriously, if it wasn't such a good restaurant I think that would have turned me off going back, but it is THAT good so I will just have to hope that a diaper change can wait until our return to the car.

Pros: Great food, fresh seafood, modern ambiance, clean restrooms

Cons: No changing table!!, it may be hard to maneuver a double stroller once the tiniest hurricane is big enough to tag along in the jogging stroller.